90's Craft Night!
I looked forward to this one for a long time.

For our last meeting of the Autumn session, I wanted to do something fun. So... we based our night on the 90s, and got to make some of the crafts I used to do as a kid.
Our snack was a knock off of Dunkaroos (teddy grahams with rainbow chip frosting), and Hi-C Ecto Cooler (which luckily is back for the Ghost Busters reboot).
What the pictures here can't capture is the 90s music playlist played from Spotify (complete with all the classics I made a fool of myself dancing to).
Also not captured is my denim on denim outfit, and the bobble knots I wore my hair in.

We started out with standard bead animals.

If you didn't have a neon lizard hanging off of your backpack in the 90s, you're lying.

I printed out a bunch of patterns before our meeting, from pictures I gathered online. If you do a search for 'pony bead patterns' or 'beaded keychain animals' you will find dozens. Or, you can steal the file of ones I collected here.

After I explained how the beading worked, I also gave the kids the option to create their own designs. I was pretty impressed with what they came up with. Look at how awesome this Leonardo turned out!

If you've never made a beaded animal before, I'll let you know right now that they're very easy to do, and very hard to explain. You'll start out with a long string and a keychain. fold the string in half, then thread it through the keychain, and pull both of the loose ends through the loop of the string. Pull this tight, and it will be attached to the keychain

Following whatever pattern you choose, string the correct number/color of beads onto one side of the string (string A). Thread the other side of the string (string B) up through the beads in the other direction. Pull both strings tight until the beads run horizontally under the keychain. Continue working down the pattern, adding beads as indicated.

Occasionally there will be a break in the pattern for non-vertical pieces (such as legs or beaks that stick out from the sides). These will use only one side of the string (string A OR string B... not both). In this case, you will thread the beads onto one string, then reverse that same string through the beads in the other direction. Typically, you will thread four, then skip three and revers through only the top bead.

The patterns are usually fairly easy to follow, and there are dozens of tutorials online if something doesn't make sense.

Our other craft was the stretch choker (except, we made them into bracelets, due to our short period of time for two crafts).
Almost everyone I knew wore one of these things on a daily basis. Mine was black with blue beaded stars on it. They're pretty easy to make once you get the hang of them, but the first couple usually turn out pretty rough. My current system isn't foolproof by any means, but it has certainly improved since 1998.

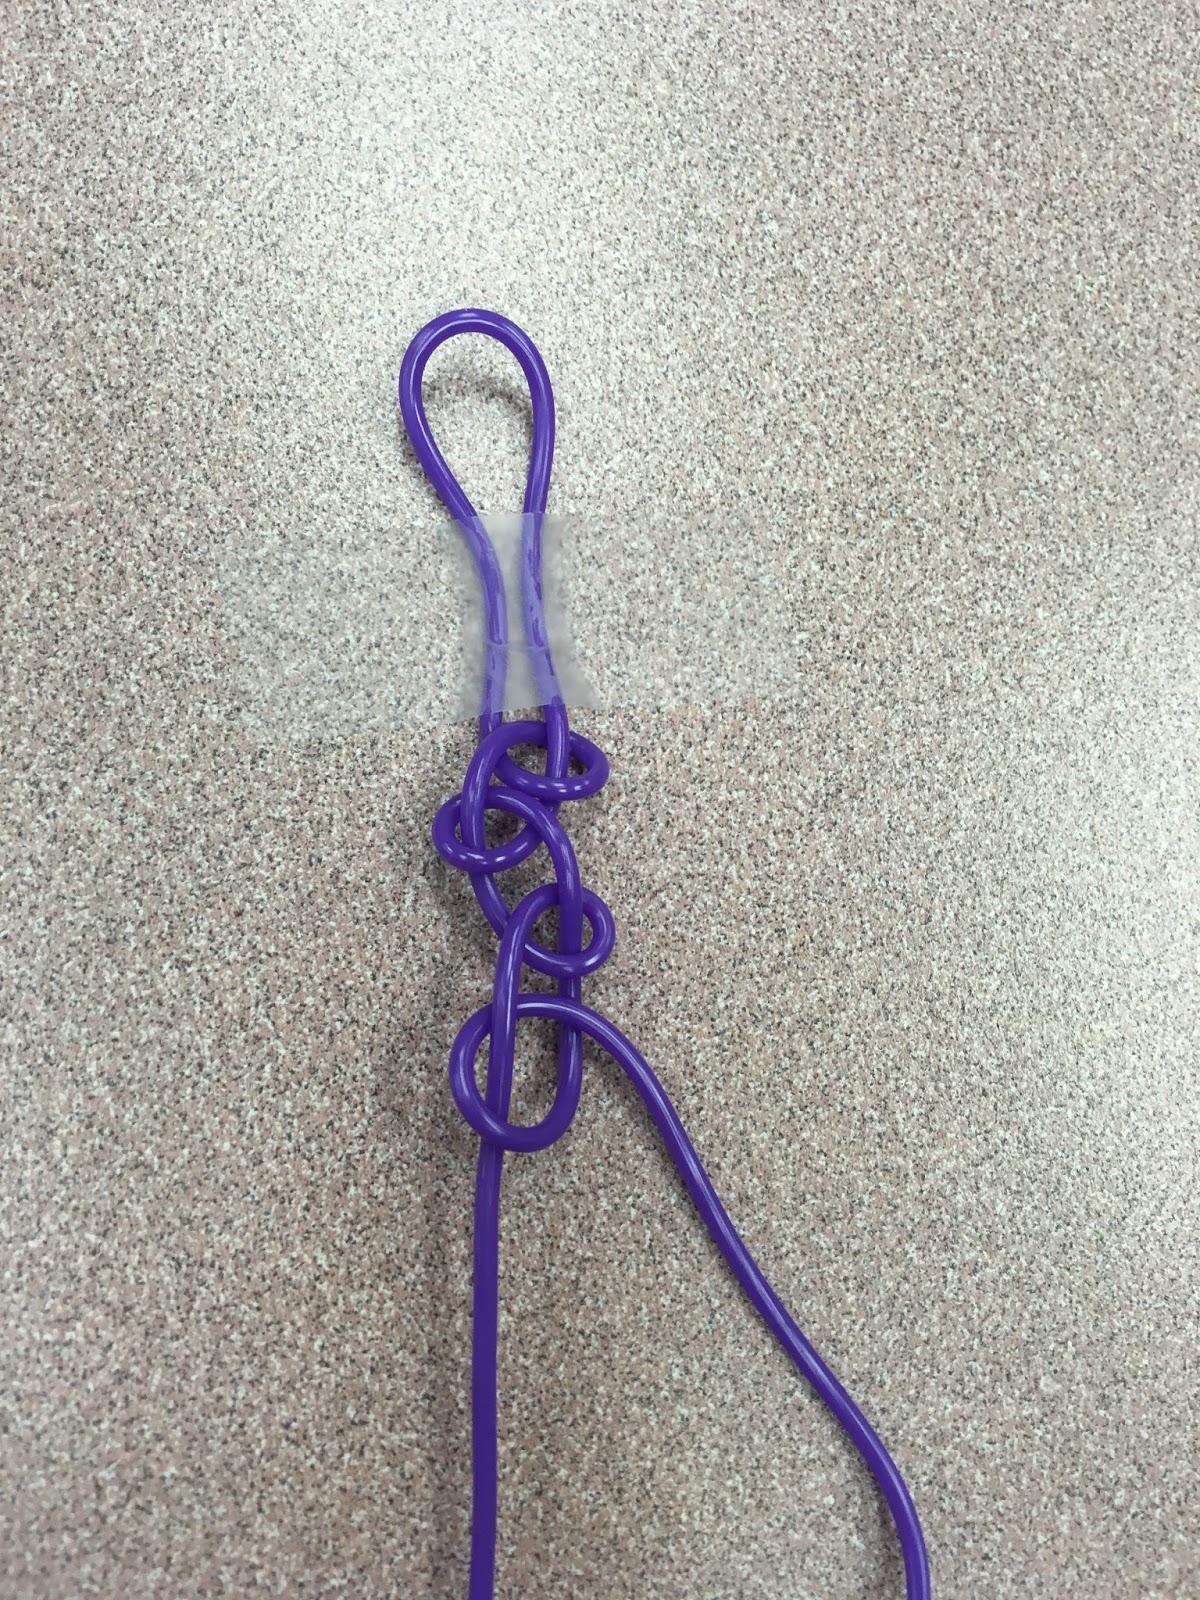
All you need for this one is stretch cord. These are usually done with a thin cord (either stretch or a solid plastic), but we used a bulkier cord to speed things up. Fold the cord in half, and tape it flat to your table, or other flat surface. You will have two strings, A, and B. In these examples, A is on the left side, and B is on the right.

The steps for this pattern are pretty simple if you don't overthink them. Cross, Through, Up, Down, Switch. You will only be moving one side of the string at a time. This will be the 'active' string. Begin by crossing one side (A) over the other (B) to make a '4' shape. Loop the horizontal (A) part of the 4 through the loop you have created by going around the stationary vertical part (B) like the first step in tying your shoes. Pull the active string (A) up (away from you, toward the tape), then down (toward you, away from the tape). After you have a loop, switch your attention to the other string, repeating in the opposite direction.
It sounds complicated, but if you focus on just a few things, it should run smoothly.
- Pay attention to which string is 'active.' It can be easy to accidentally use the wrong string. With the younger kids, I have found it useful to tape down whichever string is stationary. If you do this, the 'switch' step refers to switching your tape to the other string.
- Focus on keeping the cord flat. If the cord rotates, the directions get off very quickly, and the whole craft may have to be undone to fix it.
- Don't skip the 'up' step. It seems unnecessary, but it really helps to even out each loop on the cord. Without this step, the loops come out lopsided, and sometimes twisted.
- Recite the steps. I find it a lot easier to keep track of what I'm doing by simply repeating what needs to be done with the strings. Cross, Through, Up, Down, Switch.'

In this image, you can see the tape keeping the stationary string in place. The tape holds the left string down in the first four images, and then is switched to the right string as it becomes stationary for the next loop.
I know these directions don't make a ton of sense, but hopefully the pictures help. I also made this quick video to show the basic steps that are repeated in the pattern. At the end of the cord, simply tie a knot through the top (taped) loop. Voilà! You have an authentic 90s style choker!
FUN! I was a substitute teacher in the late 90's and my middle schoolers taught me how to make bead lizards...I love them!
ReplyDelete