Monday, October 31, 2016

Halloween


Happy Halloween!


Happy Halloween from Wallace the desktop Pygmy Puff! He hopes you're all having a wonderful holiday!
Wallace is dressing up as Harry Potter this year. He had so much fun at our Newt's Magical Mapquest program that he just had to carry on with the same theme!


Newt's Magical Mapquest

Newt's Magical Mapquest

Halloween Family Fun Night


Post in progress... more pictures coming soon!

Our Halloween Family Program was dedicated to Fantastic Beasts and Where to Find Them. We had a lot of fun with the variation on a Harry Potter theme. 

Each child started out with a map that led them around the library, introducing them to different creatures they would encounter. 

Each section of the library was labeled with the creature for that activity... including their Ministry of Magic classification, and information from the Fantastic Beasts book.
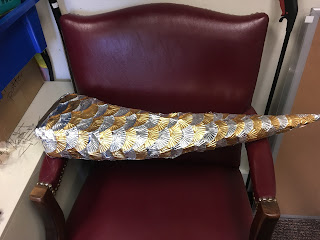
The dragon tail decoration was created by taping newspaper into a curved cone
shape, and using hot glue to attach halves of metallic muffin liners so that
they overlapped to create scales.

The dragon area was our craft for the night. TP rolls were wrapped in green sheets of paper. Pom-poms were glued to the top (small for the nose, slightly larger for the eyes) with googly eyes added to the front. Each dragon had red, yellow, and orange streamers glued around the inside of its mouth. When you blow through the roll, the streamers at the end move as though the dragon is breathing fire. After completing the craft, kids received a 'D' stamp on their map.


The Pixie station had a 'plinko' board. We modified this with a printed title and printed pixie images taped to the coins.
The station's decor was completed with two caged pixies. One made of modeling clay and attached to a decorative birdcage with fishing line, and one a simple silhouette in a fairy jar.


The Acromantula area was completely decked out in large spiders (which were easy to find around Halloween). This was a pretty fun game. We filled a tub with green water beads, and a few plastic spiders of different shapes and sizes. There was a scoring system where each spider was worth a different number of coins.


After School Crew - Week 4

After School Crew- Week 4


Game Cases


Overall- these could have worked out better. It was a cute concept, and a few of them turned out REALLY nice, but the craft took much longer than the time we had, and several of the kids needed more assistance than one adult was able to give. These may be better for slightly older children, or for an activity at an overnight (or longer than 1 hour) program. 

But... you live and learn. At the end, I'll include a few things I would have done differently.


 We started out with old DVD cases. We get a lot of these at the library, so it was cool to recycle everything. I cut out any obnoxious bumps ahead of time. Most of the plastic parts were fine, but if they were easy to take out, I removed them. The kids cut felt to fit in these cases and glued it to the inside.


I pre-cut the velcro into squares (3/4 inches). We bought an offbrand fastening tape that was front and back (in a roll). This was easy to use, as it stuck to the felt. We didn't need to glue the velcro down or anything, which sped things up a little. Each kid needs 32 squares of each color. It's easiest to put them down starting from the center to keep the squares straight. There should be 4 columns on each side of the case, with 8 rows that line up to each other.

I did have the kids figure this out with a little math (yes... I already knew how many they needed of each color. Shh). We counted (and then added) the number of columns (4 on each side) and rows (8) on the example, multiplied them, and divided by the number of colors (2).


We decorated paper for the cover of our cases (mine here is pretty simple, but there was a lot of coloring involved in the kids' projects). On the back, we drew a tic-tac-toe hashline. We used sticky back velcro on the case itself to fill in these spaces.


The buttons each got a tiny (VERY tiny) piece of velcro to stick on the back. We used the other side of the sticky back velcro for this part. Each kid needs two colors, with 12 buttons of each. We added two king pieces for each color as well (either drawing a crown with a sharpie, or using larger buttons of the same color). When the buttons aren't in play, they stick to the velcro on the edges. I had velcro along the sides of mine, but realized it wasn't necessary.

Things I would do differently:
  • I would prepackage these into kits. It took a while for the kids to count out their velcro pieces, so if I were to do this again, I would separate sets with 32 squares of each color in individual baggies.
  • I would pre-cut the felt. I thought it would be nice to let the kids pick any color they wanted out of the box of felt, but many of the children spent a very long time deciding, or changing their minds about what color they wanted (plus, it took a surprisingly long time for some of them to cut through the felt once they found it). In a re-do, I would cut felt to the proper size in a variety of colors for them to choose from. It would limit their options, but would speed things up considerably.
    • While we're at it, I'd pre-cut the colored paper for the covers.  
  • I would sort the buttons. I think the kids liked picking through the buttons to find matching ones for each 'team,' but this also took much longer than necessary. If I had them sorted (even very generally... light colors, dark colors, blue/green, red/orange, etc.) it would make things a little easier. 
  • I would guard the sticky back velcro. We were a little low on this material, so it may not be as much of an issue for future groups. As I said, it only took a teeny-tiny bit of velcro on the back of each button. In the future, I would distribute these strips as needed so that it was divided up a little more fairly between kids.


Tuesday, October 25, 2016

After School Crew- Weeks 2 & 3

After School Crew- Weeks 2 & 3

Sock Animals!


We spent TWO of our meetings on this craft... but I certainly think it was worth it!
We used Danielle's Place and This Site for inspiration on our no-sew sock animals. The first link has a great tutorial for the unicorn doll (or... what we made into a unicorn, at least). 
This was another craft where the kids got to create whatever they wanted. We had a lot of fun brainstorming how to create different creatures!

The animals are made by stuffing (clean) socks with polyester fiber fill and simply tying off small sections with embroidery floss. We had more luck tying floss around the 'bubbles' than using rubber bands. The bands snapped and slid, so they weren't as reliable. I was surprised by the difficulty some of the kids had (several of them didn't know how to tie a knot), but with a little adult help, we were able to make it work.

For the dolphin, we tugged on the 'top bubble' until it got a nice point. 
The end of the tail is simply tied off with embroidery floss in two sections to create the flippers. 


At the very bottom of the Danielle's Place link, there are patterns for clothes for the stuffed animals. The toe of a sock can easily become a hoodie, and the ruffled tops make a nice skirt or dress. We had a great time coordinating outfits for our stuffed animals once they were completed. Lots of colorful, patterned socks were used.


The bunny was made with the pattern for the puppy in the second link, 
but the ears were left long instead of doubled over. 

After stuffing the socks and tying the 'bubbles,' we (I) hot glued buttons, felt, floss, and pipe cleaners onto the creatures to create faces and other details. We ended up with a couple caterpillars, a cheetah, a few unicorns, a bunny, a bird, a dog, a person, and some other creatures I'm forgetting. 


And look! One of the kids let me take a picture this time!


After School Crew- Week 1

After School Crew - Week 1


Display jar I created as an example

You may have seen these all over Pinterest, but we started out our Autumn ASC with creatures in jars.

We glued tissue paper around a jar, added glitter, cut out a silhouette, and added a tea light inside. VoilĂ ! The kids got to add whatever type of creature they wanted. We ended up with a baby dragon, a unicorn, and several different fairies (one girl added a jack-o'-lantern, so the light flickered through its eyes... How creative!). We (I) then used hot glue to add ribbons, jewels, craft foam, and other decorations to the tops and backs of the jars. Anything was fair game, as long as they could still open, so that the light could be switched on and off.... and the silhouette wasn't covered in the front. 

Once everyone was finished, we switched out the lights to see all of the creatures inside. 

The kids didn't seem very eager for me to take pictures of their crafts... so for now I just have pictures of my examples. 

Notes:

  • Do NOT let the children take glitter back to their seats... keep it at the front table to assist.

  • Some kids enjoyed having printed pictures they could cut out instead of designing their own silhouettes... some preferred the other way. It's best to offer both options.

  • Broadening the design from JUST fairies lets the children have a little more freedom in their creatures and decorations.


Home School Hour - Bugs


October 2016 Home School Hour

BUGS!


 Our October 2016 Home School program focused on entomology. We discussed Arthropods (what separates Insects from Arachnids?), and the parts of a 'bug.' Each table received a pile of six plastic bugs to separate into these groups. We used these 4 inch plastic bugs, and they worked very well (although some of the children had to flip the grasshopper over to count its body sections, since the wings covered its back).


I caught a few insects before the program so that we could observe and discuss our own local creatures. We talked about invasive species with the Japanese Lady Beetles, and life cycles with the Banded Woolly Bear (including a picture of the Isabella Tiger Moth it will turn into). We also observed some crickets, and a female Cabbage White Butterfly... discussing how their body shapes help them survive (strong legs for jumping, large wings for flying... the butterfly's proboscis for drinking nectar, etc.).


We talked about how to use a butterfly net, sharing tips like flipping the net over its handle so that the insects can't escape. The kids were very eager to show me how they'd catch bugs in different situations (I put the plastic bee in different spots... on a table, the floor, the back of a chair... I then handed them the net and let them show me what methods they would use to catch the bee without harming it). 


For our snack time, we had cheddar Puffcorn. Halfway through, I asked the kids to stop and take a look at their hands to see the cheese dust that was stuck to their fingers. This led to a conversation about pollination. I explained how pollen stuck to the legs of bees and butterflies as they stopped on flowers... just like the cheese dust stuck to them during their snacking. We discussed the importance of pollination, and the role bees play in our food production. We also talked about what to do if a bee lands on you, and ways we can help save their populations. 

We ended the program with a quick review. I held up each of the plastic bugs so we could talk about what we learned about them... then did the same with the jars. 


I also tried to explain cicadas, but the kids are all too young to have experienced one of the seventeen year cycles. I did give them a (very) poorly drawn image of a cicada shell, and an adult cicada displayed in a case from a few (12?) years back. Oh well... they'll get to see as many as they want in five more years!